Guides10 min read
How to Automate Instagram DMs: A Step-by-Step Guide with Screenshots
Every click from sign-up to a live comment-to-DM automation, with a screenshot of each screen.
By the Inboxa team · Updated 12 Oct 2026
You have seen other brands do it. A reel ends with “Comment PRICE”, and everyone who comments gets a DM with the link a few seconds later. It looks like it needs a developer. It does not.
This guide shows how to automate Instagram DMs from comments, one click at a time, with a screenshot of every screen in the Inboxa builder. You will sign up, pick a post, choose the word that starts the DM, write the messages and go live, in one sitting and without writing code.
If you first want to know whether automation is allowed and what keeps an account safe, read how to send automated messages on Instagram. If you are ready to build, start at step 1.
Quick answer
To automate Instagram DMs, sign up for a tool that uses Meta's official Instagram API, connect your business or creator account with Instagram's own login, and create an automation. Choose the post or reel, the comment word that starts it (such as PRICE), the first DM with its button, and the final message with your link, then publish. From then on every matching comment gets your DM within seconds, and Inboxa does this free for 200 DMs a month.
What do you need before you start?
- An Instagram business or creator account. Instagram's messaging API does not work with personal accounts. Switching is free: Settings, then Account type and tools, then Switch to professional account.
- One post or reel that gets comments. Start with something people already ask about. A new drop, a restock or a reel that shows the price tag hidden works well.
- The link you want to send. A product page, a size chart, a booking form, a catalogue, or your wa.me WhatsApp link.
- A Google account to sign up with, and your phone nearby to test the DM from a second Instagram account.
How to automate Instagram DMs in Inboxa: 12 steps
The builder is one page. On the left is a live phone preview that shows the DMs as the buyer will see them; on the right are the settings, numbered in the order you fill them in. Here is each screen.
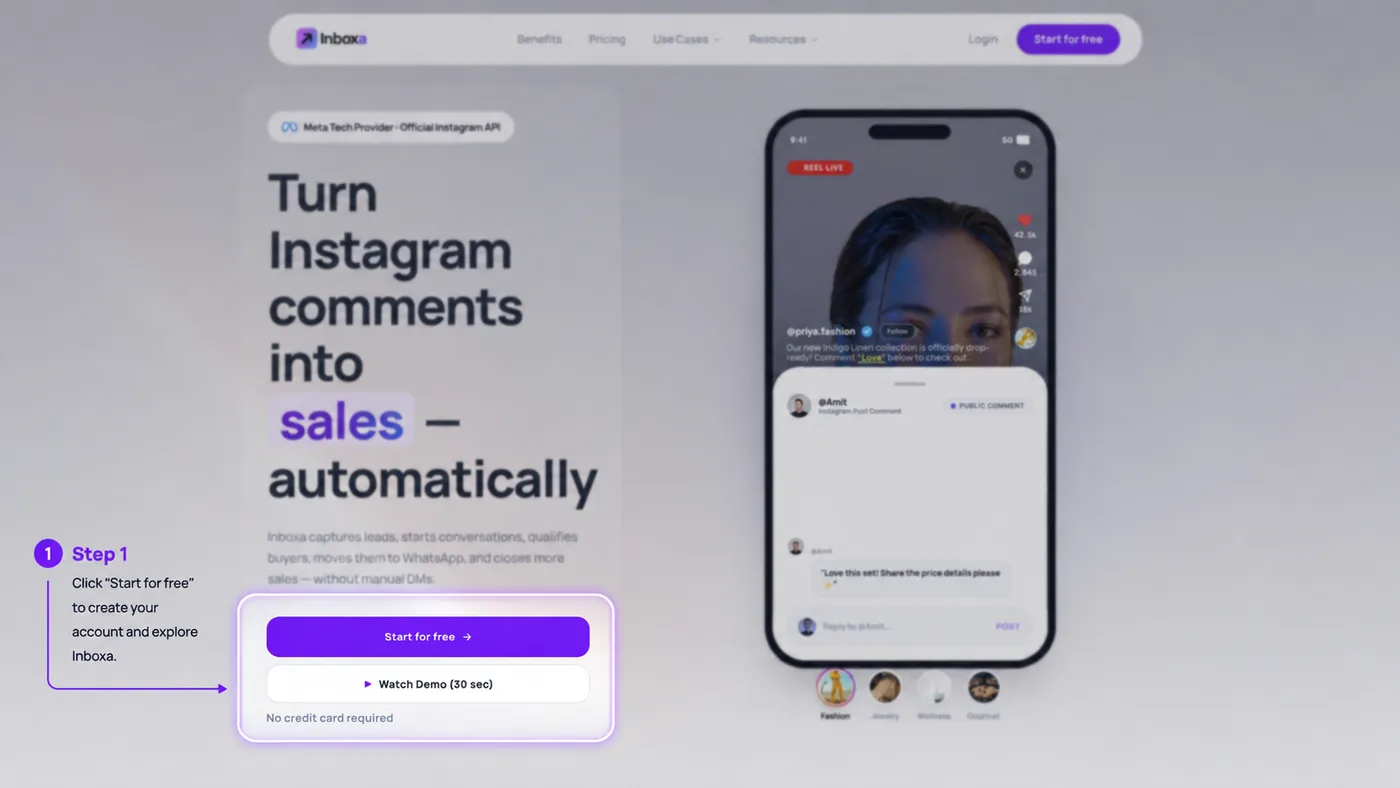
Step 1: Click Start for free
Go to the Inboxa home page and click Start for free. No card is needed. The free plan sends 200 Instagram DMs a month, which is enough to try a few posts properly before you decide anything.
Step 2: Sign up with Google and connect Instagram
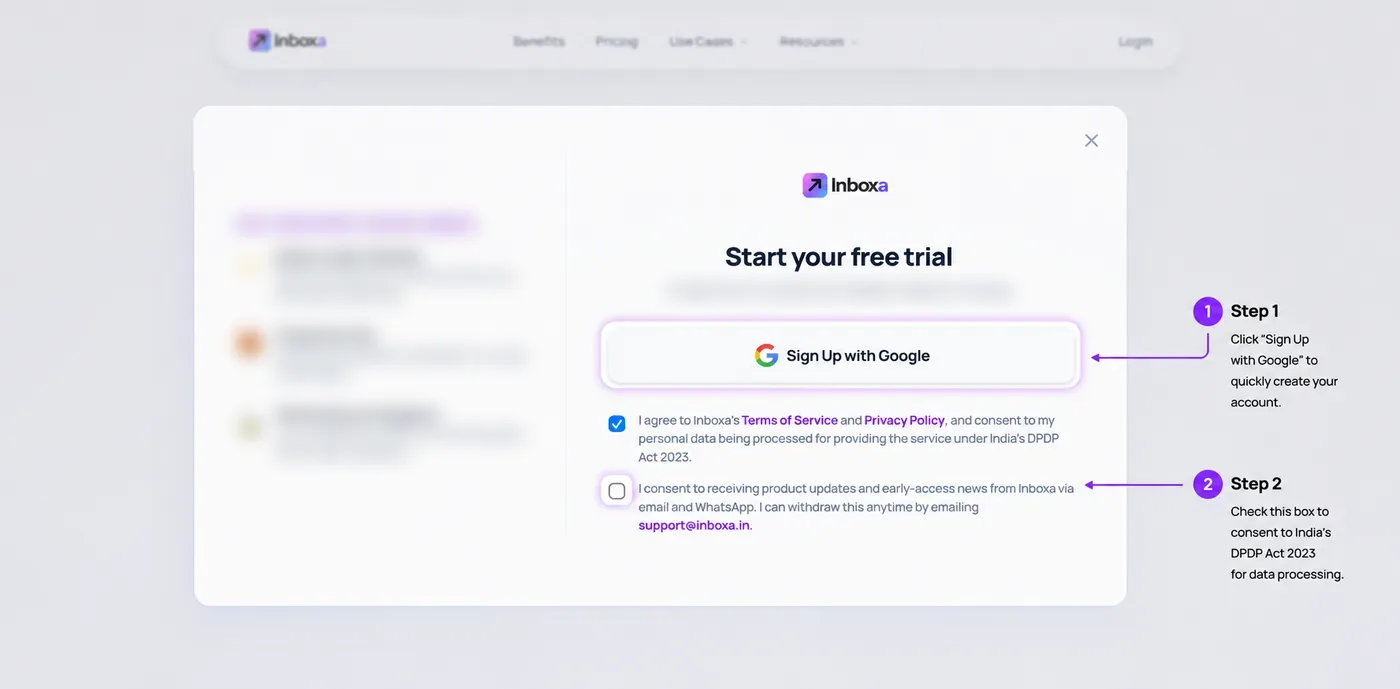
Click Sign Up with Google. Tick the first box to accept the Terms of Service and Privacy Policy; it records your consent to your data being processed under India's DPDP Act 2023, and you cannot continue without it. The second box, for product updates by email and WhatsApp, is optional.
When Inboxa asks you to connect Instagram, you are sent to Instagram's own login page to give messaging permission. You never type your Instagram password into Inboxa, or into any tool. If a tool asks for it, close the tab.
Step 3: Open Instagram and click New automation
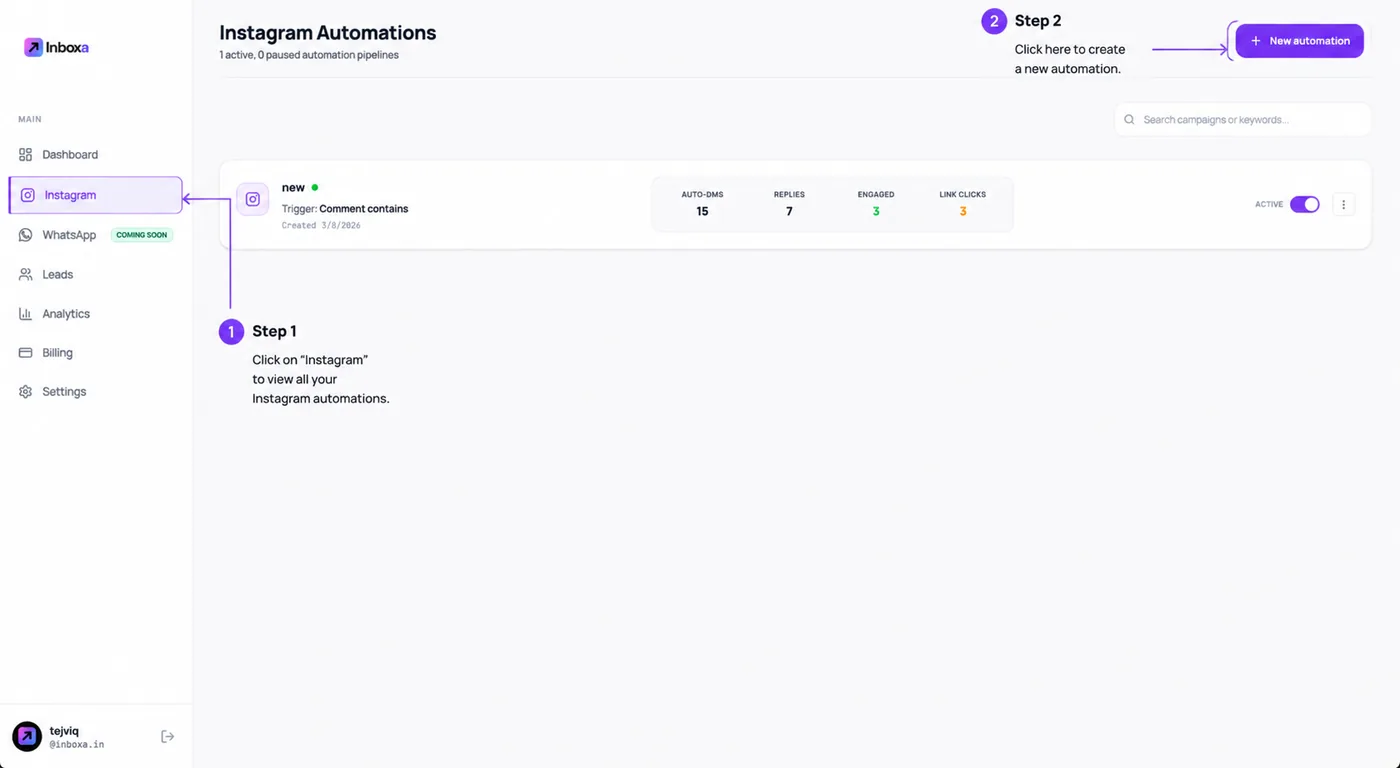
In the left sidebar, click Instagram to see your automations. Each one shows its own numbers: DMs sent, replies, people engaged and link clicks. Click New automation at the top right to open the builder.
Step 4: Name it and choose the posts
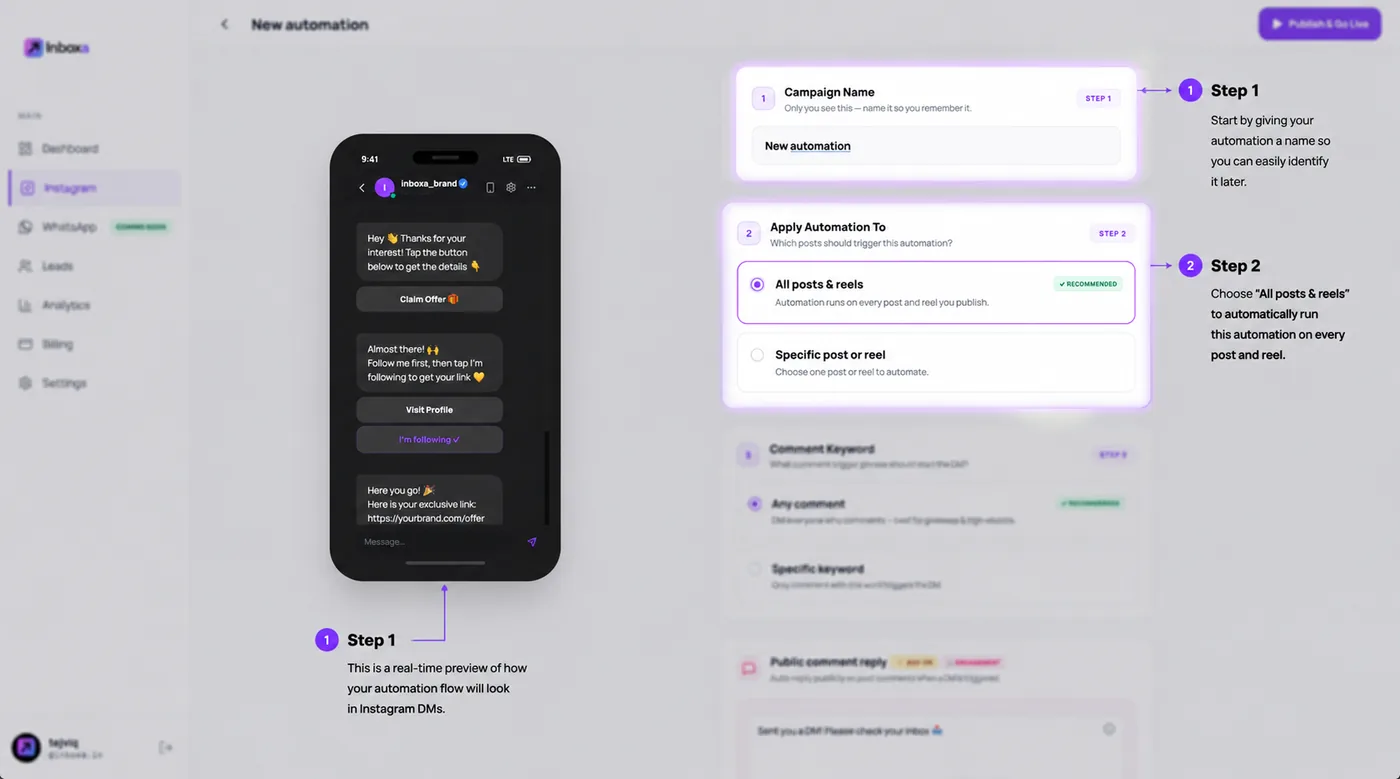
Give the automation a name only you will see, such as “Diwali kurta drop” or “Serum restock”. Then choose where it runs: All posts & reels, so every post you publish answers comments on its own, or Specific post or reel, for one drop or one giveaway.
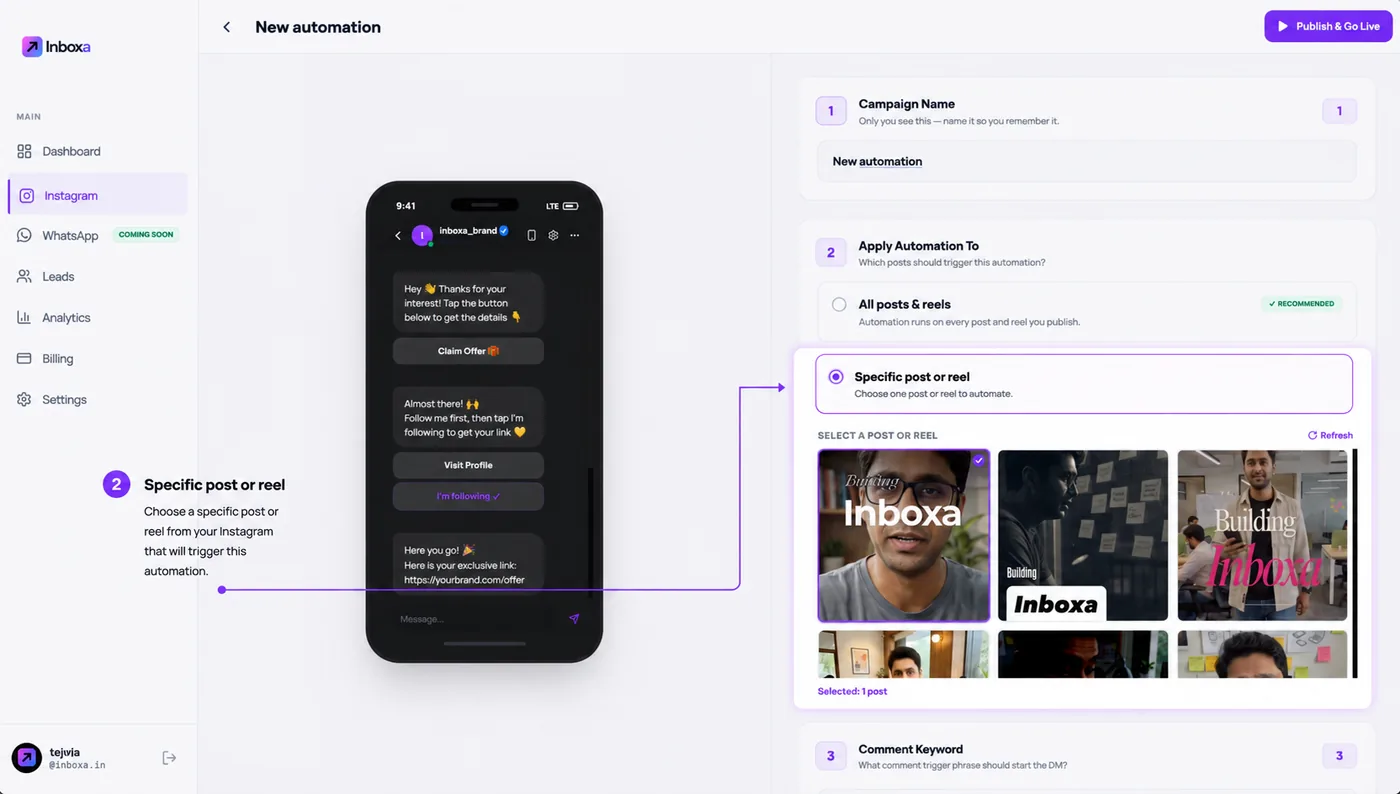
If you choose a specific post, a grid of your recent posts and reels appears. Tap the one you want; the builder confirms how many you selected.
Step 5: Choose the comment word
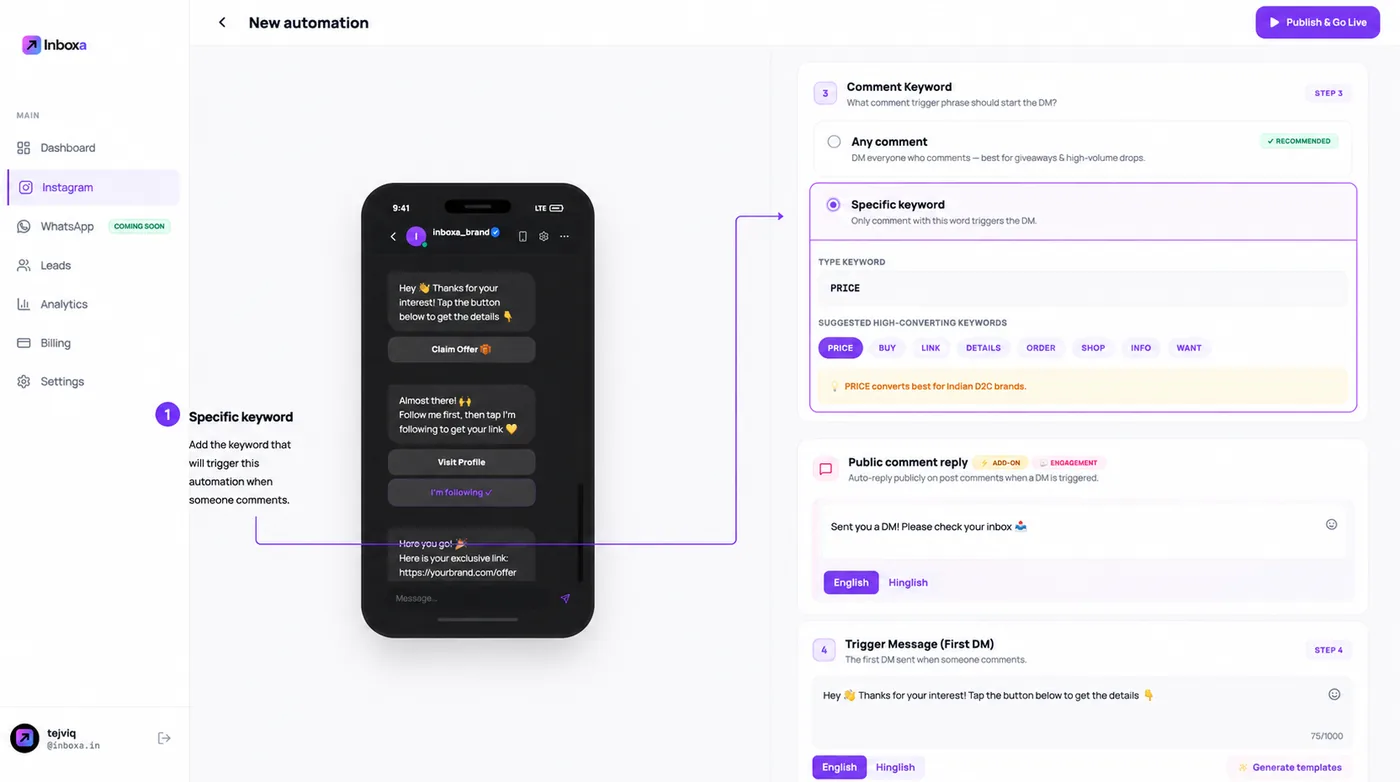
Under Comment Keyword, pick Any comment to DM everyone who comments, which suits a giveaway, or Specific keyword so that only comments with your word start the DM. Type your word or tap one of the suggestions: PRICE, BUY, LINK, DETAILS, ORDER, SHOP, INFO, WANT.
Step 6: Write the public reply and the first DM
Turn on Public comment reply if you want a short reply posted under each comment, such as “Sent you a DM, please check your inbox”. Other people scrolling the comments then see that you answered.
Then write the Trigger Message, the first DM that lands in the commenter's inbox. Keep it to two lines: thank them and tell them to tap the button. The link comes one tap later.
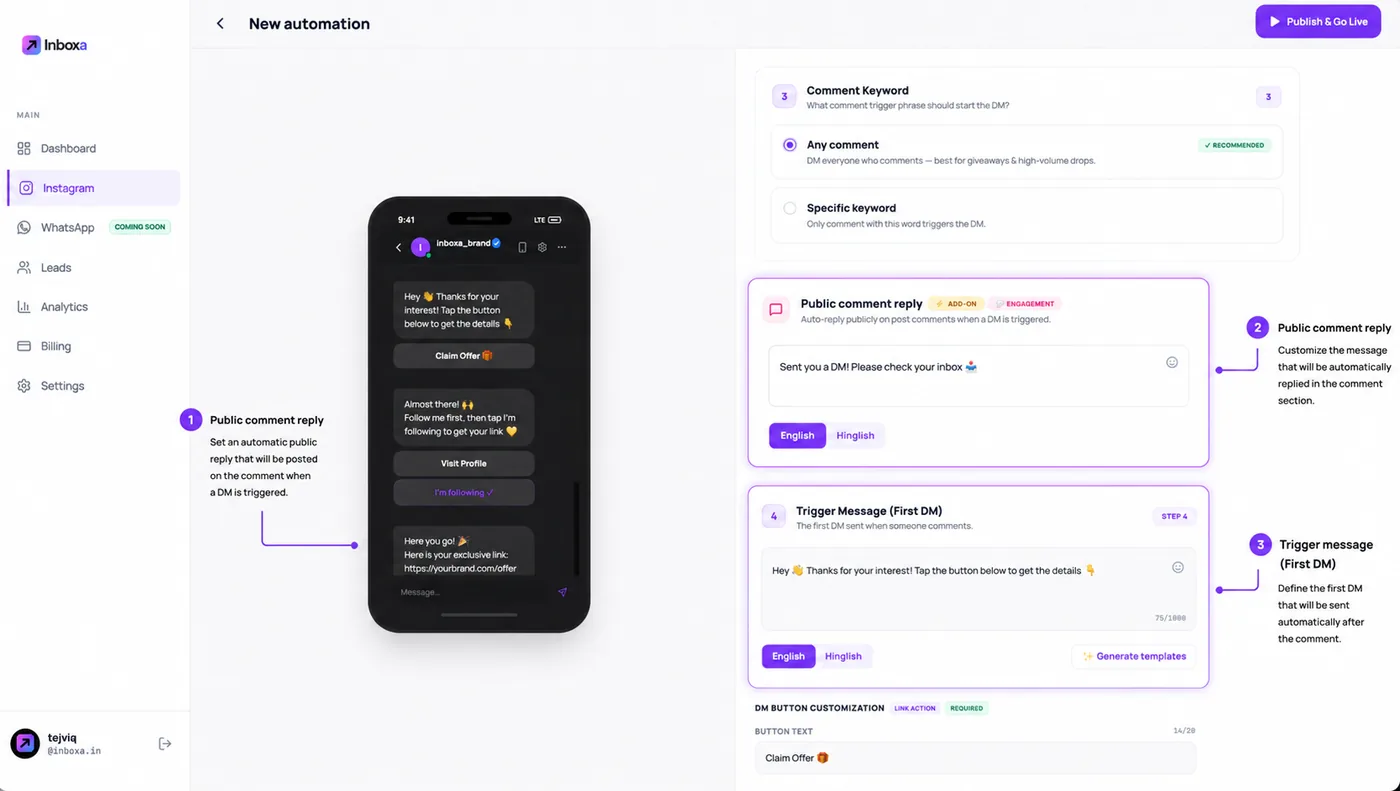
Step 7: Set the button, and ask for a follow if you want
Under the first DM, set the button text the buyer taps, up to 20 characters, or pick a quick idea: Claim Offer, Buy Now, Register Free, Get Access. The phone preview shows exactly how the DM and its button will look.
Below it, Require follow before link asks people to follow your account before the link is revealed. The DM shows a Visit Profile button and an “I'm following” button. Use it when growing followers matters for that post; leave it off when you only want the sale.
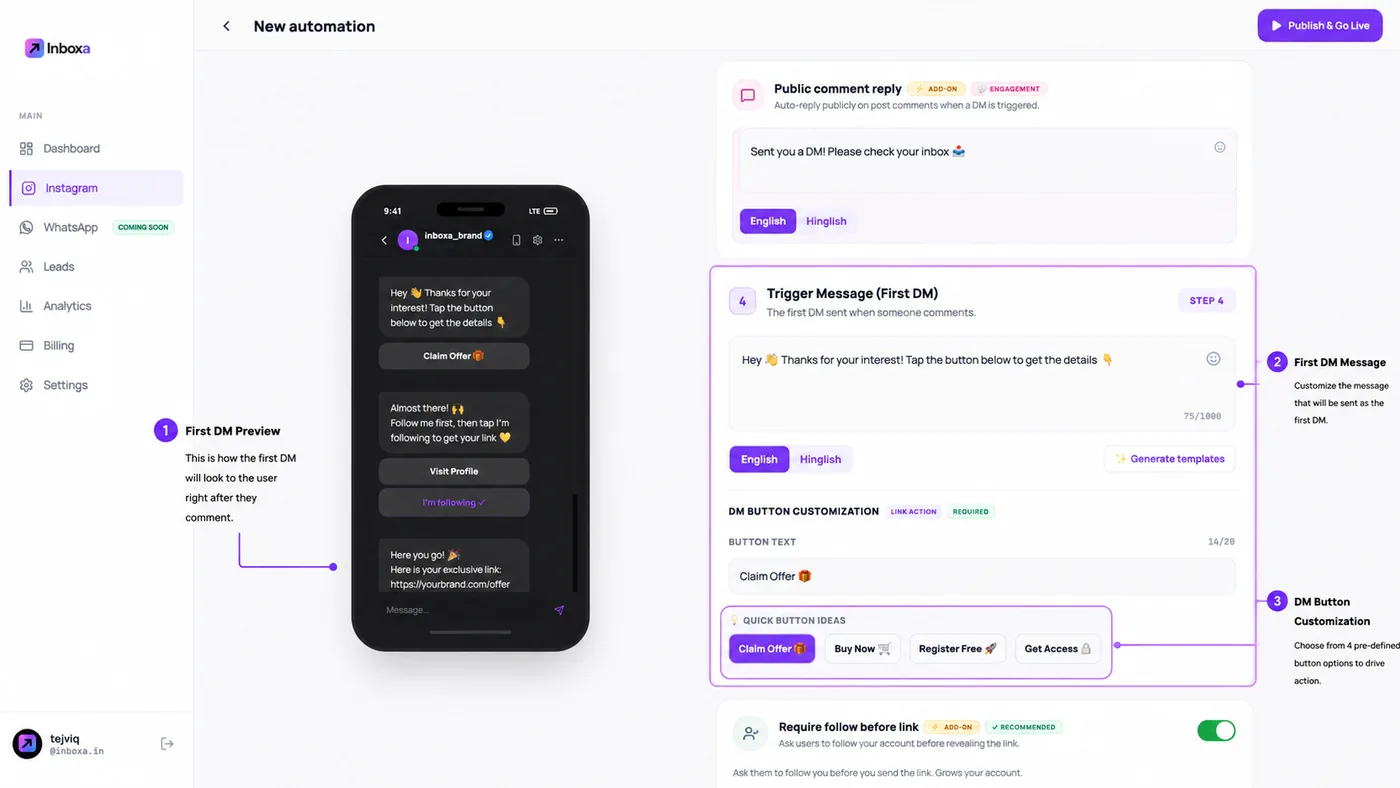
Step 8: Switch a message to Hinglish
Each message in the flow has an English / Hinglish switch, so you can write the public reply in English and the DM in Hinglish, or the other way round. Write the way your buyers comment. You can also type in Hindi, Tamil or any other language; the DM goes out exactly as you wrote it.
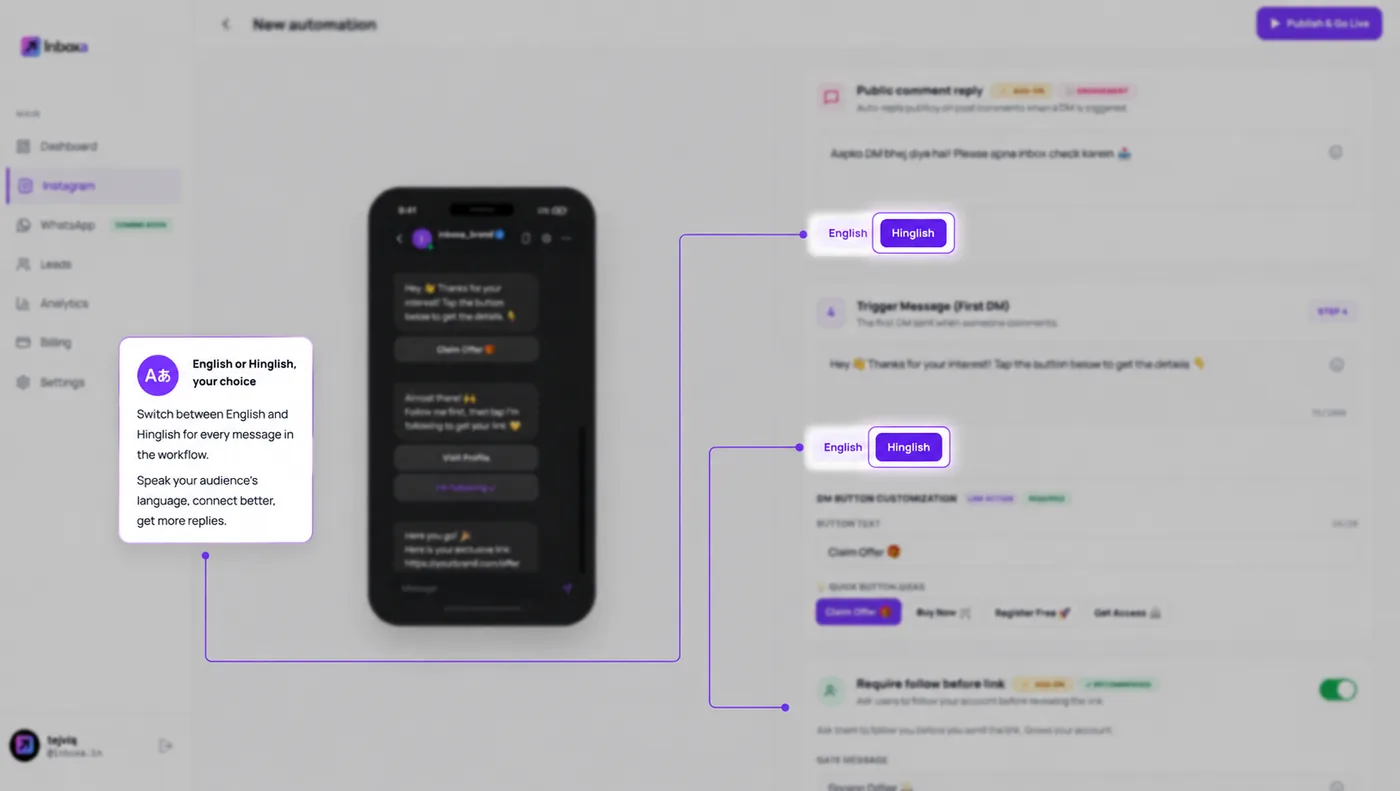
Step 9: Start from a template (optional)
Not sure what to write? Click Generate templates and pick a ready-made first DM for your kind of business: jewellery and accessories, fashion and clothing, beauty and skincare, home and lifestyle, food and beverage, or coach and creator. Then change the words so it sounds like you.
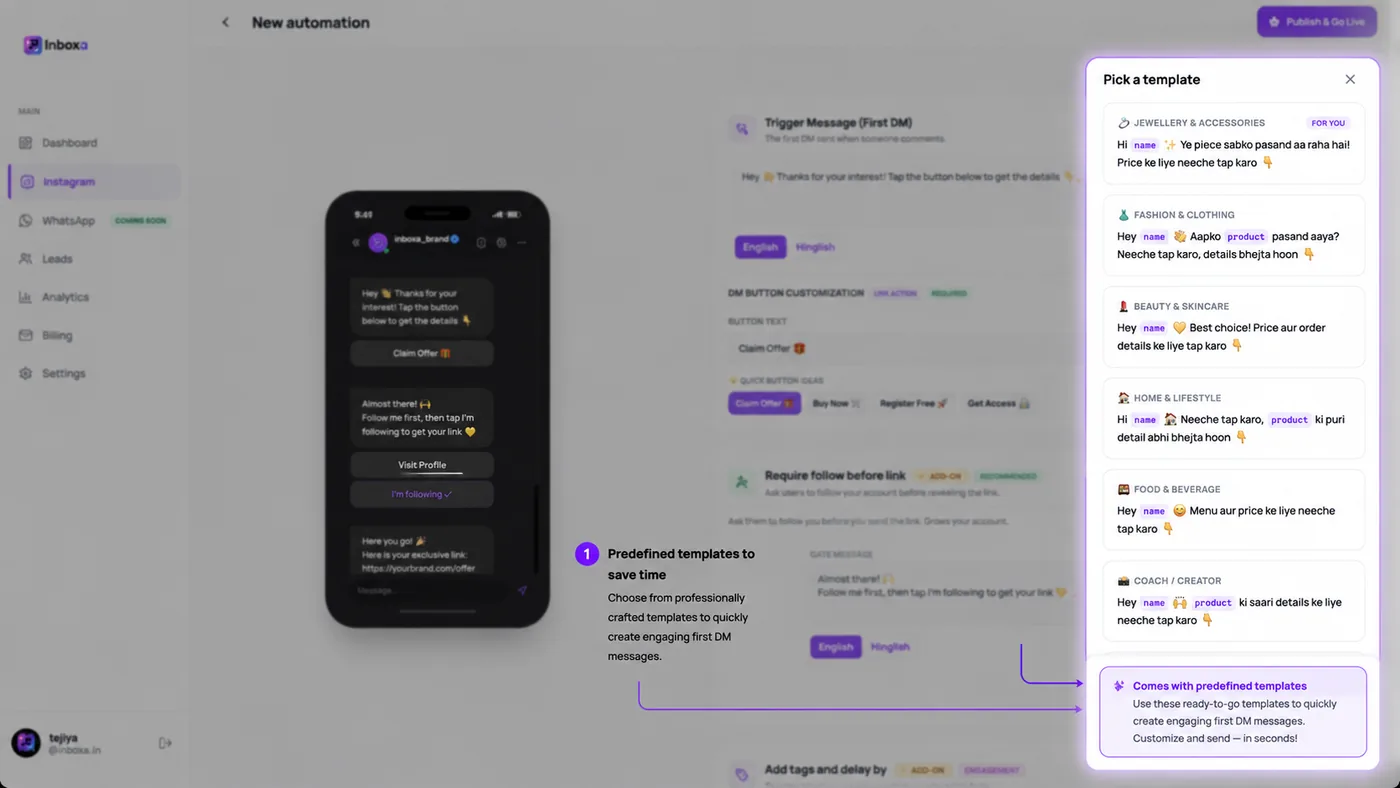
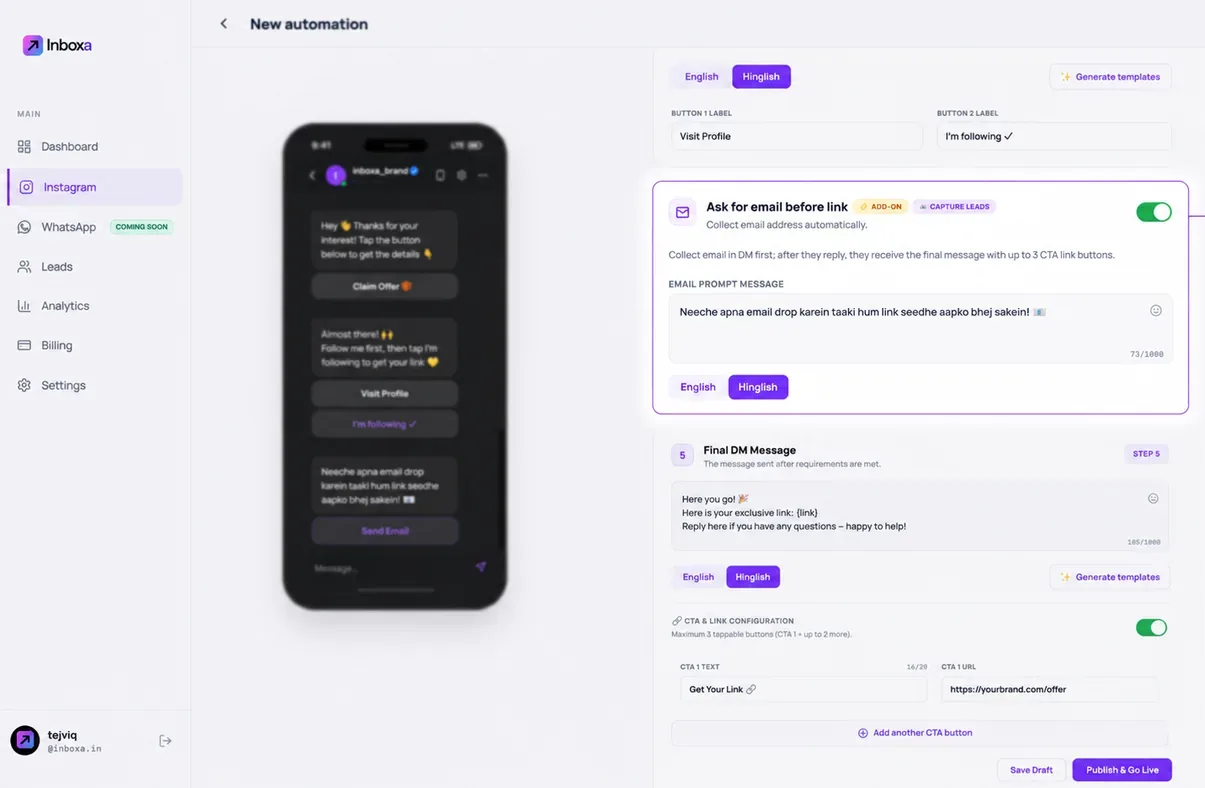
Step 10: Ask for an email before the link (optional)
Turn on Ask for email before link to ask for the buyer's email inside the chat. Once they reply with it, they get the final message with the link. Use this when you plan to email those buyers later, and say why you are asking.
Step 11: Write the final message and add your link
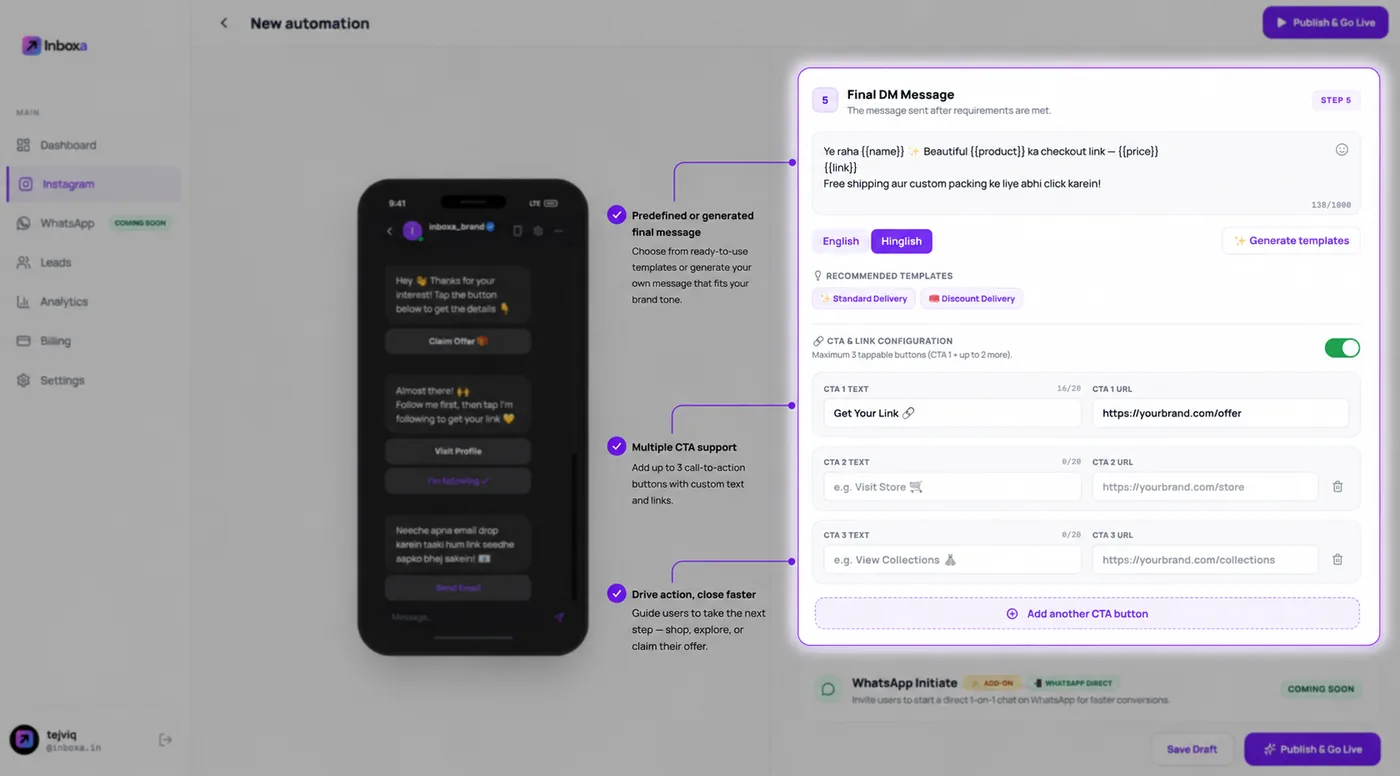
The Final DM Message is sent once the buyer has done the earlier steps. Put your link in it and set the button: the builder takes up to three buttons, each with its own text and link, such as Get Your Link, Visit Store and View Collections.
The link can be anything: a product page, a Shopify or Instamojo checkout, your own Razorpay or UPI payment page, or a wa.me link that opens a WhatsApp chat with your business.
Step 12: Publish and go live
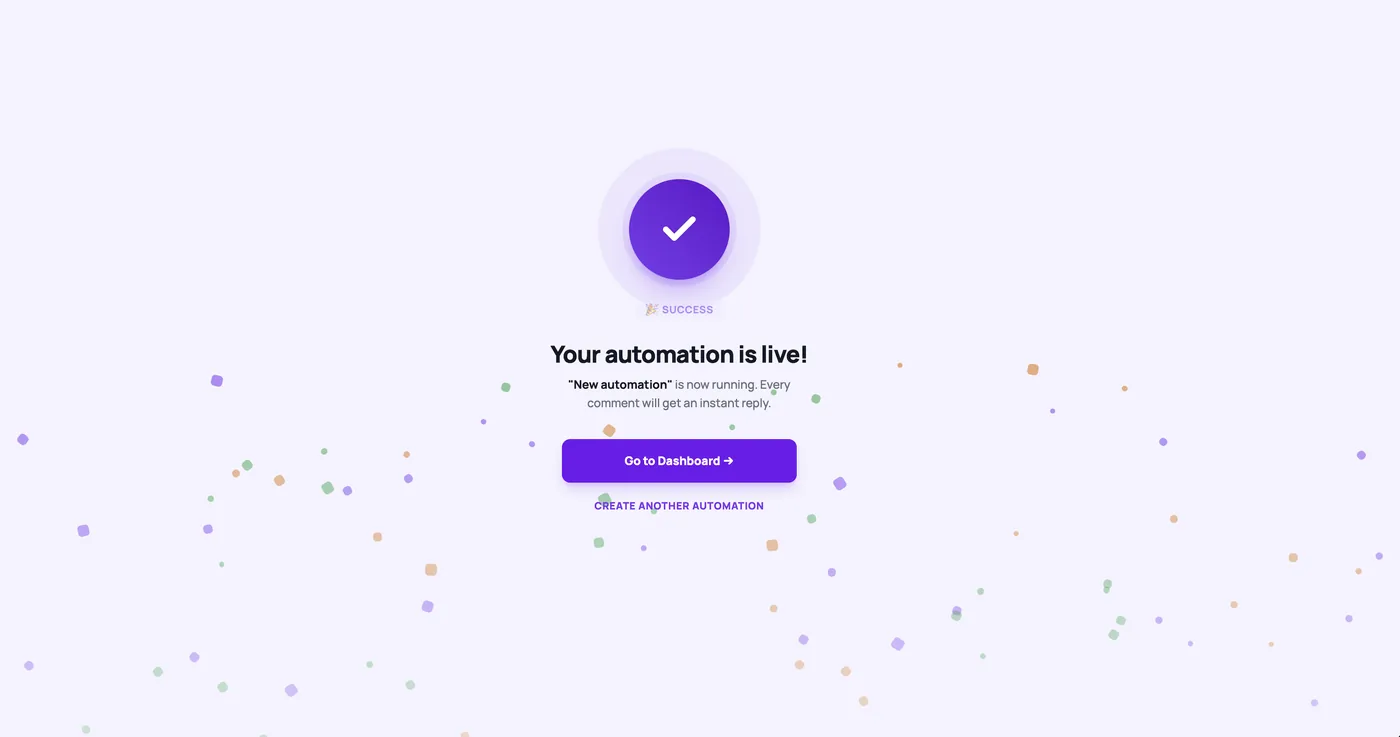
Check the phone preview once more, then click Publish & Go Live. The automation is on, and every matching comment gets your DM within seconds, day or night. Comment your word from a second account to see it work.
What happens after someone comments?
From the buyer's side, the flow you just built looks like this:
- They comment your word, for example PRICE, on the post or reel.
- The public reply appears under their comment, if you turned it on.
- The first DM arrives within seconds, with your button.
- They tap the button. If you asked for a follow or an email, they do that step next.
- The final message arrives with your link and buttons.
- It is all recorded. The automation's numbers go up (DMs sent, replies, people engaged, link taps), and the buyer appears in your leads list with their @handle, the word they typed and the steps they took.
You can download the leads list as a CSV and use it for your own follow-up, for example a message to everyone who tapped the link but did not order.
Is it safe to automate Instagram DMs this way?
Yes, when the tool runs on Meta's official Instagram API and you connect with Instagram's own login, as in step 2. That is the route Meta approves for businesses. Tools that ask for your password, scrape comments or click through the app for you break Instagram's terms and can get an account restricted.
Instagram also allows a business one message per comment until the person writes back. That is why the first DM carries a button: every message after it follows the buyer's tap or reply, so the flow stays within that rule.
Automating Instagram DMs for Indian brands: what's different
- Hinglish and Hindi. Many Indian buyers comment in Hinglish, and a formal English DM can feel cold next to their comment. The builder's switch and templates make a Hinglish DM a one-click change.
- WhatsApp. You will see “WhatsApp, coming soon” in the sidebar. Today, put your wa.me link as the final message's link and one tap opens a chat with you; a one-tap Chat on WhatsApp button is coming to Inboxa.
- Paying. Inboxa does not create payment links. If you sell on UPI, paste your own Razorpay or UPI payment page as the link.
- Sale weeks. Comments jump during Diwali and sale weeks. Publish the automation before the post goes live, not after the comments pile up.
- Data. Under the DPDP Act 2023, ask only for what you need. Turn on the email step only if you will use the emails, and tell buyers why you are asking.
How much does it cost?
Instagram does not charge for these DMs. On Inboxa, the free plan sends 200 DMs a month with no card, and each person's first DM ends with a short “Powered by Inboxa” line. Paid plans start at ₹999 a month for 1,000 DMs and go up to 20,000 DMs a month, without that line. Each Instagram account can send up to 500 DMs a day. The pricing page lists every plan.
Common mistakes to avoid
- A word nobody types. Pick a word people already comment, like PRICE, LINK or ORDER, and put it in the caption. An unusual word gets no comments.
- A word that is too common. “Yes” or “nice” fires on comments that never asked for anything.
- A first DM that is all link. Thank them and say what they will get; the link comes one tap later.
- Every optional step at once. A follow step and an email step on the same post make the buyer work twice before they see a price. Start with neither, then add one.
- Not testing before a big post. Publish on a small post first, comment your word from a second account and check every message before a launch.
- Never looking at the numbers. Compare DMs sent with link taps for each automation and rewrite the one that lags.
For the bigger picture, including what Meta allows and what to write in the DM, read the Instagram DM automation guide for India. The Instagram DM automation page shows the whole flow on one screen.
Frequently asked questions
How long does it take to set up Instagram DM automation?
Most of the time goes into writing the two messages. The clicks themselves are the twelve steps above, and you need no code and no developer.
Do I need a business or creator account to automate Instagram DMs?
Yes. Instagram's messaging API works only with business and creator accounts. Switching from a personal account is free and takes about a minute in the app's settings.
Can I choose which posts the automation runs on?
Yes. Choose all posts and reels so every post you publish is covered, or one specific post or reel for a single drop or giveaway.
Can I send the DM in Hinglish?
Yes. Each message in the builder has an English and Hinglish switch, and you can also type in Hindi or any other language. The DM goes out exactly as you wrote it.
Can the DM send people to WhatsApp?
Yes, with a link: make your wa.me link the link in the final message, and one tap opens a chat with your business. A one-tap Chat on WhatsApp button is coming to Inboxa soon.
What word should I use to trigger the DM?
Use a short word your buyers would type anyway, such as PRICE, LINK, ORDER or DETAILS. Put it in the caption or at the end of the reel so people know what to comment.
Is automating Instagram DMs free?
Instagram does not charge for these DMs, and Inboxa's free plan sends 200 a month with no card. Paid plans start at ₹999 a month for 1,000 DMs.
Build your first automation now
Follow the steps above on your own account: 200 DMs a month free, no card, on Meta's official API.
Start for free